Tuesday, August 30, 2011

House Dressing


I really like tossed green salads... at restaurants.  I have had to work for years to create salads at home that I truly enjoy.  But at a restaurant, I am often drawn to the salads on the menu.  It’s just never the same at home.  It’s the dressing! Don't you think? (well and the candied nuts, boiled eggs, nice cheese and marinated grilled meat).  So, I am always trying to uncover the secret to what’s in the dressing when I am eating out.  This week we went to Pei Wei, and I got the Asian Chopped Salad with that amazing tangy Asian dressing, and I kept trying to guess the recipe.

If there is a “house dressing” at a restaurant, I almost always choose it.  It means that they make it there, in house.  It means it is the favorite, their specialty.  And I want to have that!  I remember a restaurant we frequented in college that had a warm, honey bacon dressing as their “house dressing” and I was in love with it.  And there was a blue cheese vinaigrette at another fine eating spot.

When at Grayton Beach this summer, our family went to a famous local restaurant/dive, the Red Bar.  You might have seen the T-shirts people wear.  It is a fun, eclectic, cluttery restaurant that locals and visitors frequent.  I had a salad topped with grilled fish.  It was good –  really good. But the best part of my meal was the dressing.  It is their house dressing – a tomato basil vinaigrette, and it is so tasty.  I got the recipe, or one that is pretty darn close to it, when I was in Florida.  We have tried it at home and it’s a hit.

It’s sweet enough and vinegary enough for my liking, and herby and not-too-sweet enough for Dave.  You’ll have to try it and let me know what you think.
\/\/\/\/\/\/\/\/\/\/\/\/\/\/\/\/\/\/\/\/\/\/\/\/\/\/\/\/\/\/\/\
Here it is:
Red Bar Tomato Basil Dressing:
1 1/2 cup olive oil
3/4 cup red wine vinegar
1/3 cup brown sugar
2 Tbsp tomato paste
2 cloves fresh garlic, minced
1/2 tsp dry basil
1/4 tsp oregano
1/2 Tbsp worcestershire
1 egg yolk*

In a medium bowl, whisk egg yolk until light yellow.  Add oil slowly, whipping continuously.  Add vinegar and all other ingredients.  Stir well until fully incorporated.

*Now, I know some of you are freaking out because there's a raw egg yolk in this dressing recipe, but I think it has legitimate reason for being there. "They" say it is an emulsifier and therefore improves the texture and smoothness.  If you can't bear the thought of it, I imagine you could use an egg substitute, or omit it altogether.

\/\/\/\/\/\/\/\/\/\/\/\/\/\/\/\/\/\/\/\/\/\/\/\/\/\/\/\/\/\/\/\/\/\/\

So, I think it would be fun if every salad-fixing household had their our house dressing. (Even if it is a Good Seasons packet with oil and vinegar, or even Newman’s Own Balsamic Vinaigrette).
If I had a house dressing, I'd have a hard time choosing.  I like this Tomato Basil Dressing, but I also like... 

A Greek Dressing.

And I love a sweet Vinaigrette...and you can't beat a creamy Balsamic Vinaigrette.


What would your house dressing be?

Tuesday, August 23, 2011

On Top of Spaghetti...


Why do we love Spaghetti and Meatballs? They seem to be universally adored (unless of course you're a vegetarian)! I mean, my father in-law loves when we make this dish and my 3 year old daughter loves it as well.  

Is it the "On Top of Spaghetti" song that eating a big bowl of it inspires us to sing?  Or is it the fun images of the classic children’s book (recently made into movie), Cloudy With a Chance of Meatballs,  that makes it iconic somehow?  Or is it because you can make little bitty meatballs or GREAT BIG HUGE meatballs? It is a comfort food indeed. There is just something so tasty and fun about this meal and it's so easy to throw together.

I started making spaghetti and meatballs years ago when my son was a toddler and didn’t like meat sauce with pasta, but yet we wanted to add some kind of meat to the meal. [I think meat sauce is unappealing to some people – something about the texture of the ground beef throughout the sauce.]  So, in order to ramp up the noodles-and-red-sauce dinner, and to give us some protein, I tried making some meatballs.  I made turkey meatballs with a recipe from an Everyday Food magazine.  They were simple, fairly healthy and they were a hit!  We all loved them.  A few years later, the Everyday Food magazine published another meatball recipe, this one with beef called "easiest meatballs". Both recipes are winners although the beef has less steps.  I have combined the two recipes into one, simple, tasty meatball recipe that can be done with ground turkey or beef. They can be made on the spot or ahead of time.  They also freeze well in a ziplock bag.  It's a winner.


For sauce: (if you want to make a simple homemade sauce)
3 tablespoons olive oil
4 cloves garlic, minced
5 cups canned crushed tomatoes
1/2 teaspoon dried oregano
1/4 teaspoon dried thyme
Salt and pepper
    
In a large non-stick skillet, heat olive oil over medium heat.  Saute garlic until golden, 1 minute or so.  Add tomatoes, oregano, thyme.  Add salt and pepper to taste.  Let simmer for 10 minutes.
       
For meatballs:
1 large egg
salt and pepper
2 cloves garlic, minced
1/4 cup plain breadcrumbs
1/2 cup freshly grated Asiago or Parmesan cheese, plus more for serving
1/2 cup chopped flat-leaf parsley (or sprinkle in a few shakes of dried parsley instead)
1 pound ground turkey or beef (we like to use Laura’s Lean Beef, which is a leaner, healthier cut of ground beef – a nice, lower-fat beef option)

1 pound spaghetti noodles

Make the meatballs: In a large bowl, whisk together egg, 1 teaspoon salt, and 1/4 teaspoon pepper with a fork. Stir in garlic, breadcrumbs, cheese, and parsley. Add ground meat and mix until combined. 

Form mixture into 1 1/2 inch balls (golf ball size). [Keeping your hands wet when forming the meatballs will prevent the meat from sticking to your hands.] 

If you made the homemade sauce,  add the meatballs to the skillet, covering them with sauce.  

If you opened a jar of lovely bought sauce, place the meatballs in a large non-stick skillet, over medium heat.  Cover with sauce.

Bring to a boil, lower heat, and simmer, gently turning after 10 minutes.  Cook until meat is cooked all the way through.


Meanwhile, bowl a pot of water and cook spaghetti until al dente (according to package instructions), about 12 minutes. Drain pasta, serve, top with meatballs and sauce. Serve with more cheese sprinkled on top...of spaghetti....(sing it with me)! 


***There are many ways to cook the meatballs.  Some recipes call for baking them on a baking sheet in the oven, some call for browning them in olive oil in the skillet on stove top.  I think because this recipe uses lean meat, it works well to cook them in the sauce, as Martha recommended in the original recipe.  There is not much excess grease and cooking them in the sauce keeps them moist and tender, not dried out and tough.


P.S.
We had a nice tutorial with our children about using a large spoon to help eat spaghetti the other night. We showed them how to use a spoon as leverage to twirl noodles onto a fork.  However, it wasn’t the most effective lesson- as evidenced here!


Tuesday, August 16, 2011

The End of the Pits

I have a thing for kitchen tools.  I really like them.  Garlic presses, zesters, kitchen scissors, measuring cups... In fact, for my birthday and Christmas, I usually get some kind of kitchen tool as a gift from my family.

Some gadgets you have in a drawer and never use.  They are not worth the space they are taking up in your drawer, and hardly worth having to wash when you've used them.  Others you use everyday.  Then there are those that you don't use often, but when you do it's so helpful that nothing else could do what it does.

the amazing pitter


My cherry pitter falls into the 3rd category!
Do you have one?
Have you ever used one?

It's genius! When I pull it out to use it –people are wowed!  It's simple, inexpensive, it takes very little drawer space and with the squeeze of your hand you can have a pitted fresh cherry.  And as special as cherries are,  cherries with pits are a challenge to reckon with – unless you enjoy the eating and spitting activity. (Which I do, given the right time and setting).

When you have cherries with the pits removed you can put them in a fruit salad, or make a pie, or chop them up for a topping on a meat dish.  You can find one at a kitchen store for about $10. (Ours is the oxo brand that my mom got at Bed, Bath and Beyond a few years ago).  You ought to consider buying one, if you love fresh cherries.


Lucy is really into cherries and is actually a very skilled pitter with this handy dandy gadget, especially considering that she is 3 years old.

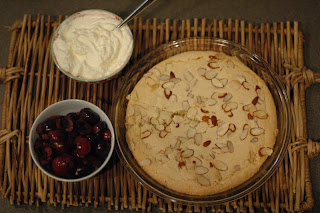
My friend Melissa (the florist) was coming over for our women's prayer group the other night and was in charge of bringing a goody.  A few minutes before group she texted to tell me that she was on her way and asked if she could use my pitter for cherries for her dessert.  "Of course" was my reply and in a few minutes she arrived with a delightful Almond Shortcake, freshly whipped cream and fresh cherries.  We oohed and ahhed. She said our friend, Beth, who gave her the recipe serves it with blackberries.  Both sound amazing to me.

The Almond Shortcake is like a huge, puffy, almond sugar cookie with toasted almonds on top with a crunchy edge.  There is something so simple, yet elegant about this shortbread and it is de-li-cious! It seemed like the Shortcake and the cherries complemented each other so well.  Don't you think almonds and cherries often do that?


1 cup sugar
1/4 cup (4 Tbsp) unsalted butter
2 eggs
2 tsp almond extract
1 tsp vanilla extract
1 cup all-purpose flour

For topping:
1 Tbsp sugar
1 Tbsp sliced almonds

Preheat oven to 350º
Cream the sugar and butter
Mix in almond and vanilla extracts
Mix in eggs, one at a time
Mix in flour until combined
Pour into a greased 9" pie pan
Top with sugar and sliced almonds
Bake for 20-25 minutes until lightly browned on edges and a toothpick comes out clean.

Top with whipped cream and fresh fruit: berries or cherries or peaches. 

Cherries have been on sale the past few weeks here – so it has been time for cherries at our house.  And the pitter has hardly made it to the drawer, as it has been in constant use.  So, go get yourself a pitter or add it to your wish list!


Tuesday, August 9, 2011

Rosemary Cheddar Biscuits

Do you ever eat at a restaurant and wonder…"What is this seasoning?" or "How did they make this amazing dish?" or "I wonder what ingredients they used?"  Well, I do.

Sometimes I brainstorm what all could be in something.  Sometimes I have to close my eyes to discern it.  One night I tasted this squash soup and I couldn’t pin-point the flavor that was added to the squash in the puree.  Then I closed my eyes and the taste was obvious to me – it tasted like chicken noodle soup!  So I knew that it must have been chicken broth!

Sometimes I take a photo on my phone to remember the presentation, or the moment, or to jog my memory later, or just to savor it a little while longer, even if just through a photo!

the inspirational breakfast biscuit

Well, during our kids’ spring break in March, I snuck away with my friend Melissa (the florist Melissa) sans kids to have some uninterrupted quality time together (we each have 3 kids, so our time together is typically pretty rowdy).  We met for breakfast at one of our favorite local coffee shops, the Frothy Monkey.  Melissa got the special that was mentioned on the chalkboard:  a Rosemary Cheddar Biscuit with Swiss, Prosciutto, and spinach leaves. She let me have a bite and it was lovely!  I took this photo and decided that cheddar biscuits, plain or with anything on them, were something I needed to make.


I added it to my “to do” list and early this summer I dug around for a good cheddar biscuit recipe. I found this one from Southern Living a few years back.  It is simple to throw together, and the biscuits are flaky and delicious! I have made them twice now.  The first time, I made both with Rosemary and without.  My kids didn’t appreciate the strong herby taste, but I thought it was a nice addition.  We ate them straight off the plate.  I made them another time and sliced them open, then filled them with scrambled eggs and tomato.  You could put anything you want on them – breakfast meats, eggs, cheese, veggies, or butter and jam!

I love that a moment of breakfast yumminess in March at a cafe inspired batches of biscuits this summer.
Be inspired– replicate a tasty dish from a restaurant at home!  The crazy thing I want to replicate these days is the amazing Chick-fil-A Sauce (smokey honey mustard). I really want to figure out how to make it at home. Any ideas?


simple ingredients
1 ½ cups all-purpose flour
1 Tbsp. baking powder
½ tsp. salt
1 Tbsp. sugar
1 cup shredded sharp Cheddar Cheese
1/3 cup Crisco shortening
½ cup milk
20 rosemary leaves, chopped (optional)

Pulse first 4 ingredients in a food processor several times until thoroughly combined. 
Add shredded cheese and Crisco, and pulse 4 or 5 times or until mixture is crumbly.  With processor running, gradually add milk and mix until dough forms a ball and leaves the sides of the bowl.  If you are including the rosemary, add it now, and thoroughly blend.


Turn the dough onto a lightly floured surface; shape into a ball.

Pat or roll dough to ½ inch thickness, cut with a 2 inch round cutter and place on baking sheets. Then sprinkle a few shreds of additional cheese on top of each biscuit.

Bake at 425 degrees for 10 minutes or until golden.

crumbly dough mixture

ready for baking
with or without rosemary!


Monday, August 1, 2011

Cup-A Cup-A Cobbler

This time last year, I could never have guessed what a gift this blog would be in my life.  Started on a whim, as a way to find some creative outlet in my busy, duty-filled life, with very limited knowledge of blogging and sparse skills in the realm of technology.  Last August,  I was facing the beginning of another school year, and the end to another summer where I didn’t get to paint, or learn how to sew, or quilt, or print-make.   After reading The Homemade Life I was inspired.  I thought it would be a fun creative outlet to merge my love of sharing yummy recipes,  telling stories and connecting with people.  I took a risk, asked Dave if he would partner with me to help with the technology of it, and see if we could give it a try.  He said, "Yes!" and before you know it we were securing a blogspot and trying to come up with a name for this unknown adventure.
The name, Cup-a Cup-a, came to me as I was pondering my intention of swapping ideas, recipes and finds with friends. I was inspired by the recipe sharing that was done in the film Steel Magnolias of the cake recipe. Clairee, my favorite, asks Truvy for the recipe for her Cup-a Cup-a Cup-a. She told her she didn’t need a recipe it was just “a cup of flour, a cup of sugar and a cup of fruit cocktail with the syrup, stir and bake in a hot oven ‘til golden brown and bubbly. I serve it with ice cream to cut the sweetness.” And though I’m not a big fan of canned fruit cocktail,  I am a fan of southern women and sharing what you know.  Thus this blog began.
A few months ago someone asked me for the recipe for the cup-a cup-a cobbler that I like to make and I realized that I have never posted about it. Kind of ridiculous!  So I decided to post it today in celebration of the 1 year anniversary of this blog.  And the Peach version was in order since they are at the peak of the season and my blog began with peaches this time last year.
Cup-A Cup-A Cobbler (Dump Cobbler)
This is the easiest cobbler. It is magical because the crust rises to the top while baking.  It is the very simplest cobbler and it is so very yummy. You pour in the batter, top with the fruit and during the cooking time, the batter seeps through to the top and forms a buttery, lovely crust with the cooked fruit below.  And as my friend Amy, reports that what makes it so yummy, as the batter leaves some of its gooey breadiness in the filling so that it thickens it.
It is embarrassingly simple, from-scratch, and a crowd pleaser. And, you really must serve it with a scoop of vanilla ice cream (or "banilla", as my 3 year old, Lucy, calls it).

1 1/4 cup sugar, divided
1 cup self-rising flour
1 cup milk
1/2 stick butter, melted
2 cups fruit; Berries, Peaches, a combo (frozen fruit is great... unthawed)

(The sequence of the addition of each ingredient is important.)
Whisk 1 cup sugar with flour.
Add milk just until blended.  
Add melted butter.  
Place in greased pie plate or small pyrex dish.


Sprinkle fruit with remaining ¼ cup sugar in a bowl.  
Dump on top of batter.  Bake at 350 degrees for 40 minutes to 1 hour (until golden and bubbly and no liquid remains in the center). 

I doubled the recipe to make a larger batch.  Just make sure you put it in a big enough dish.
I make it year round with frozen fruit and it works great.

a single batch version with berries


So, thank you for reading,  trying the recipes, giving your ideas, and cheering me on.  It has been such a fun, therapeutic outlet for me and I am so honored and amazed that you continue to stop by!

My peachy keen niece!


I'm getting excited about all the recipes and ideas I want to share with you this year and look forward to the inspiring seasonal foods that are around the corner!  Here's to another year of cup-a cup-a fun!